One of favorite sensors of all time are the Sharp IR proximity sensors. These sensors are quite accurate and can be used for a variety of tasks. These are single package sensors that basically work on the principle of reflection. They output analog voltage corresponding to the distance measured (from 1 – 3.2V between distances of 4cm to 80cm). One of the main reasons why I love these sensors is that they are continuous and do not require a ping from the micro controllers to send out a pulse (like most ultrasonic sensors do!).
They are available in a number of configurations, each offering different distances. The page at acroname has a wonderful guide on these sensors.
The sensor that I am using for the current experiment is GP2D12. In this experiment, I will basically be reading the value from the sensor and based upon the readings changing the brightness and colors of the Tricolor Led.
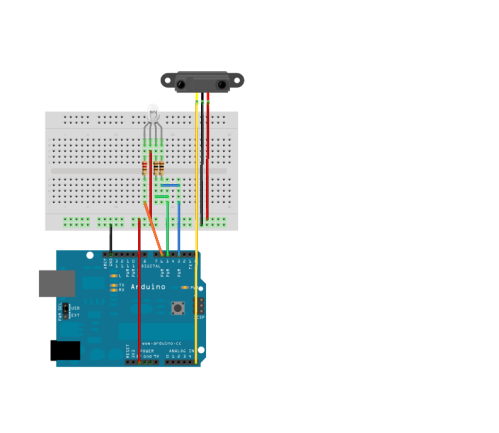
The breadboard circuit is as shown below:

The nifty figure is created using a free software Fritzing (check it out!). This software allows you to assemble your circuit in Breadboard while simultaneously creating a schematic. It also creates a PCB (with a cool auto routing feature). Though it doesn’t seem to have all the bells and whistles that Eagle gives, it is really great for simpler circuits. Below, are schematic from Fritzing as well as Eagle. In my opinion, the Eagle schematic looks better or rather more circuitish!
The actual setup is shown below:

Before using any sensor, it is important to calibrate the sensor. Sharp sensors are almost linear in their major range of operation. However, since they are reflection sensors, a lot depends on what you are trying to detect. I typically calibrate them over a subset of their entire range. Here, I have calibrated them over 20 – 50 cm. The experiment changes the brightness of the RED led from 20-30 cm, GREEN led from 30 – 40 cm and BLUE led above 40 cm.
The source code (not the best) is written in C/C++ instead of Processing. I find writing C++ easier, as it allows me to use a full fledged IDE (XCode in this case) and gives access to other libraries that are only in C/C++. You can configure almost any IDE to directly compile and upload code to the arduino. For Xcode, there is an excellent blog that covers all the steps. For Eclipse (free IDE across platforms), there are plenty of tutorials online.
#include "WProgram.h"
#include "HardwareSerial.h"
#include "SharpSensor.h"
void ledIntensity(int pin,int val)
{
if (val > 255)
{
val = 255;
}
else if (val <0)
{
val =0;
}

Serial.println(pin);
Serial.println(val);
analogWrite(pin,val);
}

void turnoff(int pin)
{
analogWrite(pin,255);
}

int analogPin = 5;
float value =0.0;
int green = 3;
int blue = 5;
int red = 6;
SharpSensor obj;
extern "C" void __cxa_pure_virtual() { while (1); }

void setup()
{
Serial.begin(9600); // opens serial port, sets data rate to 9600 bps
pinMode(green, OUTPUT);
pinMode(blue,OUTPUT);
pinMode(red,OUTPUT);
}

void loop()
{

value = obj.readInCM(analogPin);
if(value > 40.00 )
{
turnoff(red);
turnoff(green);
ledIntensity(blue,(int)(255-(value-40)*20));

}
else if (value > 30.00 && value < 40.00)
{
turnoff(red);
turnoff(blue);
ledIntensity(green,(int)(255-(value-30)*20));

}
else
{
turnoff(green);
turnoff(blue);
ledIntensity(red,(int)(255-(value-20)*20));

}

delay(100);
}

int main(void)
{
init();

setup();

for (;;)
loop();

return 0;
}
Update:
I created a small Class/ header to wrap the common functionalities of the sensor. You can download this at http://www.mediafire.com/?ddt3uu47axm2c


do you have the library file of the sharp sensor?
You can download the folder at http://www.mediafire.com/?ddt3uu47axm2c and add it as a library